
Intro

Hello, world! This is our first post on this tech blog, with hopefully many more to come. We’re Raya: a social app aiming to foster a curated community with an emphasis on trust, privacy, and safety. Above all, our goal is to help people build meaningful and lasting relationships.
My name is Kevin, and I’m an iOS Software Engineer here. 🤓 I recently graduated from UCLA (go Bruins!) and have been at Raya for almost two years now. Currently, I’m super interested in software architecture – while building elegant user interfaces is fun, I’m fascinated by the decisions and abstract problems associated with designing systems that are scalable, testable, and maintainable. I want to be able to engineer products that can withstand the test of time.
This is the first of a two-part blog series on one of the most ubiquitous iOS architectures: MVVM. In this post, I’ll explain how this architecture works and why it has made an amazing foundation to build Raya on. I’ll also detail how to build a simple Counter app using this architecture. In the next part, I’ll detail my attempt to implement an analogue of MVVM in Apple’s (relatively) new front-end framework SwiftUI. If you’re already an MVVM aficionado, you can go straight to the next part here.
Now that all the formalities are out of the way, let’s dive in! ✨
A Forewarning
This article (Part 1) will assume that you are familiar with iOS development in UIKit, and with functional reactive programming in Swift (RxSwift, ReactiveSwift, Combine, etc.). If not, there are many wonderful (free!!!!) online resources to help you get started. Regarding the latter, I’ve briefly written about it in this Medium post.
Raya’s Architecture: MVVM + Coordinator (with RxSwift and RxFlow)
The best way to explain our architecture is by breaking down each of its components. We’ll start with the star of the show: MVVM.
MVVM – Separation of Business Logic
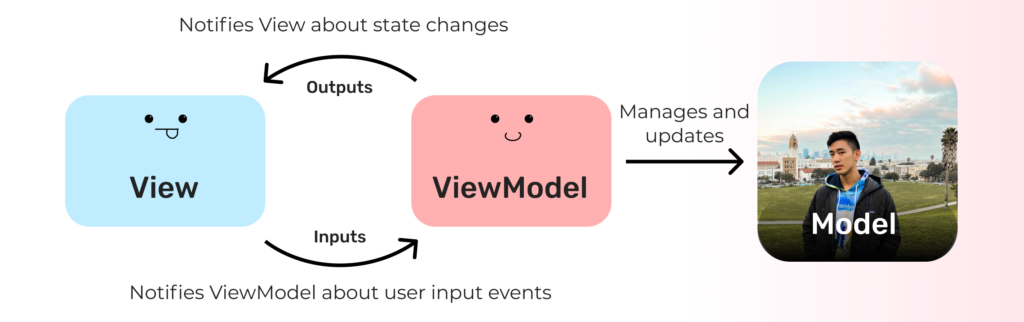
MVVM stands for Model-View-ViewModel. At a high level:
- Models are raw data objects, such as managed CoreData objects or even value-type objects stored in UserDefaults.
- Views consist of UIViewController and UIView objects when using UIKit, or structs that conform to the aptly-named View protocol in SwiftUI. The View layer constitutes everything that the user sees and interacts with.
- ViewModels encapsulate all business logic for their corresponding Views. They handle events generated by user interaction in the View layer by performing network calls, creating side effects, and updating the Model layer. Each ViewModel is owned by some View in a unidirectional manner.
Unlike the more traditional MVC architecture, Views and View Controllers do not perform any business logic and do not interact directly with the Model layer.
The Coordinator Pattern – Separation of Navigation Logic

Just as MVVM allows us to separate View logic from business logic, Coordinators allow us to separate View logic from navigation logic.
The Coordinator pattern involves eponymous (you will learn later in the article why I’m using such a stupidly fancy word) Coordinator objects that encapsulate navigation-related code. A Coordinator manages some root View/ViewModel pair. The ViewModel broadcasts certain events to the Coordinator—a button tap or a completed network call, for example—and then the Coordinator decides whether or not that event should trigger navigation. If the answer is yes, it is then responsible for constructing the next View/ViewModel pair to be presented.
RxSwift and RxFlow – The Reactive Glue
The last pieces of the puzzle are frameworks which allow us to bind Views to their ViewModels/Coordinators. By modeling user input events and state changes as streams of values over time, we can effectively write code in a functional and declarative manner.
Goals of our Architecture
So what does all this extra complexity aim to accomplish? Our architecture has three main goals:
- 👐 Separation of concerns
Logic is separated into four main areas:- Reading and writing of Models. All interaction with underlying data models must go through the Service layer. Services provide another layer of abstraction between ViewModels and Models by façading asynchronous network calls/database interactions and managed objects behind Observables and value-type structs.
- Business logic. When they are initialized, ViewModels are injected with Services and data from the previous ViewModel. They can then be called as a pure function which takes in View-generated inputs (view lifecycle events, button taps, etc.) and outputs a set of callbacks and Observables which drive the View as a function of state.
- View setup. UIViewControllers and UIViews are solely responsible for configuring their appearance, passing input events to their ViewModels, and binding to the returned outputs.
- Routing. Getting things on and off the screen is solely the job of the Coordinator.
- Reading and writing of Models. All interaction with underlying data models must go through the Service layer. Services provide another layer of abstraction between ViewModels and Models by façading asynchronous network calls/database interactions and managed objects behind Observables and value-type structs.
- 💪 Testability
By isolating business logic in the ViewModel layer and interaction with Models to the Service layer, we can test our ViewModels by injecting them with Mock Services that provide known inputs and assert expected outputs.
- 🤝 Elimination of shared mutable state
While the binding of the View and ViewModel could be accomplished using the protocol-delegate pattern or another imperative means, this often leads to code that is difficult to understand. It also usually requires the ViewModel to maintain state that the View accesses or mutates (*shudder*). This is a common source of bugs, as it’s difficult to reason about when state changes occur and whether or not everyone interested in those changes has been notified.
The purpose of using RxSwift is to replace shared mutable state with immutable and declarative streams (Observables). This isolates where state changes can occur to the declaration of the stream, and forces objects interested in state changes to explicitly subscribe to them.
Putting it all together…
Let’s prototype a simple Counter app using this architecture in UIKit. For the sake of simplicity, I will not be implementing a Service layer – but you can see one in action in the next article (I’ve got to keep you interested somehow!!).
Our Counter app will have:
- A label that shows the current count, starting at 0.
- A button that the user can tap to increment the count by 1.
- A congratulatory alert that appears whenever the count is divisible by 50.
The View and ViewModel
We can start by creating our View layer:
class CounterViewController: UIViewController {
  private let label = UILabel()
  private let button = UIButton()

  init() {
    super.init(nibName: nil, bundle: nil)
    view.addSubview(label)
    view.addSubview(button)

    // Some code to setup constraints
    constrainSubviews()
  }
}
So far, so good. Next we’ll create a ViewModel that drives the View’s appearance via its outputs.
The only thing that will actually change in our View is the text displayed by the label. So we’ll need a Driver<String>. We also need a callback to execute whenever the button is tapped. Let’s write that down:
class CounterViewModel {
  struct Outputs {
    let labelDriver: Driver<String>
    let buttonAction: CocoaAction // *
  }
}
* CocoaAction comes from the Action framework – it exposes an Observable which fires every time the action is executed (the button is tapped). It also gives us a handy way to imperatively assign an action to a button.
Next, we’ll take advantage of Swift’s special callAsFunction method that will allow us to “call” instances of our ViewModel as if they were functions. We’ll also implement all of the business logic as a reactive stream – take a look at it first and I’ll walk you through it below:
class CounterViewModel {
  struct Outputs {
    let labelDriver: Driver<String>
    let buttonAction: CocoaAction
  }

  func callAsFunction() -> Outputs {
    // The callback is empty because all we care about is when the
    // button is tapped.
    let buttonAction = CocoaAction { }

    let labelDriver = buttonAction.elements    // 1
      .scan(into: -1, accumulator: { acc, _ in // 2
        acc += 1
      })
      .map(String.init)                        // 3
      .asDriver(onErrorJustReturn: "")         // 4

    return Outputs(
      labelDriver: labelDriver,
      buttonAction: buttonAction
    )
  }
}- To create the label’s driver, we start with an
Observable<Void>that fires each time the button is tapped (this is provided by Action). - The
scanoperator lets us accumulate values over time: the first time the source observable fires, theaccvariable has the seed value of -1. We then increment it by 1 and emit the accumulator’s value (now 0). The next time the source observable fires,acchas a value of 0 which is incremented to 1, then it has a value of 1 which is incremented to 2, and so on. - We map the
Intvalue emitted by thescanto convert it into aString. - We convert our
Observableinto aDriver. Drivers always run on the main thread and never error, so it’s safe for their subscribers to add UI-related code.
Notice how we’ve used RxSwift to sequester our state in a declarative stream – we don’t even need to add any properties to our ViewModel! We’ve also managed to transform button taps into a stream of Strings our View can display without caring what those Strings actually are. We’ve completely separated the View from the business logic. It’s very pretty to look at, IMHO. ☺️
Now let’s add the code which binds the View to the ViewModel:
class CounterViewController: UIViewController {
  private let label = UILabel()
  private let button = UIButton()
  private let viewModel: CounterViewModel
  private let disposeBag = DisposeBag()

  init(viewModel: CounterViewModel) {
    self.viewModel = viewModel
    super.init(nibName: nil, bundle: nil)
    view.addSubview(label)
    view.addSubview(button)

    // Some code to setup constraints
    constrainSubviews()

    // Bind to ViewModel outputs
    let outputs = viewModel()
    outputs.labelDriver
      .drive(label.rx.text)
      .disposed(by: disposeBag)
    button.rx.action = outputs.buttonAction
  }
}
Navigation with a Flow
Lastly, we need to conditionally present a UIAlertController. I chose to present an alert for this example because it’s simple, but it could easily be interchanged with a UIViewController. We’ll start by creating a Flow, an object provided by the RxFlow framework to handle individual sections of navigation. In RxFlow, Coordinators are top-level objects that manage navigation by composing Flows.
class CounterFlow: Flow {
  var presentable: Presentable { rootViewController }
  private let rootViewController: CounterViewController

  init(rootViewController: CounterViewController) {
    self.rootViewController = rootViewController
  }
}
Next, we’ll make our ViewModel conform to the Stepper protocol. All Steppers have a PublishRelay (Subject); ViewModels emit Steps on this relay, and the Flow will receive them.
class CounterViewModel: Stepper {
  enum Step: RxFlow.Step {
    case reachedMultipleOf50(count: Int)
  }

  struct Outputs {
    let labelDriver: Driver<String>
    let buttonAction: CocoaAction
  }

  var steps = PublishRelay<RxFlow.Step>()

  func callAsFunction() -> Outputs {
    // The callback is empty because all we care about is when the
    // button is tapped
    let buttonAction = CocoaAction { }

    let labelDriver = buttonAction.elements
      .scan(into: -1, accumulator: { acc, _ in
        acc += 1
      }
      .do(onNext: { [steps] count in
        if count % 50 == 0 {
          steps.accept(Step.reachedMultipleOf50(count: count))
        }
      })
      .map(String.init)
      .asDriver(onErrorJustReturn: "")

     return Outputs(
       labelDriver: labelDriver,
       buttonAction: buttonAction
     )
  }
}
The do operator provides an explicit domain for adding side effects (e.g. triggering navigation, firing analytics) to reactive streams. By implementing Steps as enum, we can discretize the set of navigation sources from this ViewModel and use associated values to pass data.
Finally, we implement navigation in our Flow:
class CounterFlow: Flow {
  var presentable: Presentable { rootViewController }
  private let rootViewController: CounterViewController

  init(rootViewController: CounterViewController) {
    self.rootViewController = rootViewController
  }

  func navigate(to step: Step) -> FlowContributors {
    guard let step = step as? CounterViewModel.Step else { return }
    switch step {
    case let .reachedMultipleOf50(count):
      let alert = UIAlertController(
        title: "🐻 Great job superstar!",
        message: "You tapped \(count) times!",
        preferredStyle: .alert
      )
      alert.addAction(.dismiss)
      rootViewController.present(alert)
      return .none
    }
  }
}
In RxFlow, the navigate function is called any time the presented ViewModel emits a step. Returning .none here means we don’t expect to receive any steps from the new object we just presented. Had we presented a View/ViewModel pair, we would’ve returned a value that tells the Flow to start listening to the new ViewModel’s steps relay.
And that’s it! Elegant, succinct, and easy to reason about. 🥳
Next Up: A Scalable MVVM Architecture for SwiftUI
Now that you know the basics of using MVVM in UIKit, you can check out my attempt to adopt this architecture in a SwiftUI project in the next article.
See you there! 👋